Radiant Heated Grow Bench
Grow plants in your basement with little effort
Heating a greenhouse in the winter can be awfully expensive. I had to figure out how to cut my growing costs and decided to move my seed starting into the basement. What started as a simple operation with a heat pad and a few lights has grown into a fancy hot water heated bench. Radiant heating can be an effective way to provide consistent and even warmth to a grow bench or plant propagation area.
Here's a step-by-step guide on how to use radiant heating for a grow bench
Select the Right Radiant Heating System
There are various types of radiant heating systems available, such as electric radiant heat mats, hot water tubing, or infrared radiant panels. Choose the one that best suits your needs, budget, and the size of your grow bench.
Determine the Location
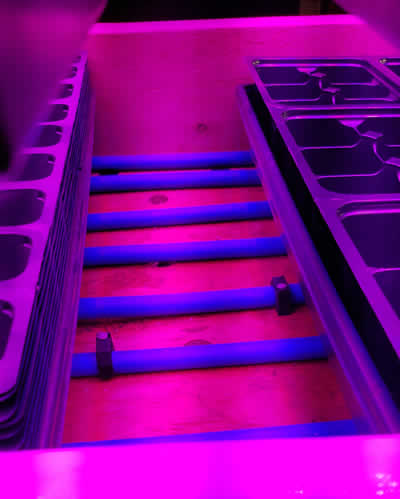
Decide where you want to install the radiant heating system. Typically, it is placed underneath or within the grow bench to provide even heat to the plants from below.
Calculate Heating Requirements
Calculate the heating requirements for your specific plant types. This involves understanding the ideal temperature range for your plants and the heat output of the radiant system.
Install the Radiant Heating System:
Depending on the type of radiant heating system you've chosen, follow the manufacturer's installation instructions carefully. Ensure that it is properly mounted, secured, and connected to a power or water source.
Temperature Control:
Use a thermostat to control the temperature. Set the thermostat to the desired temperature range for your plants. Ensure that the temperature is accurately monitored and maintained.
Insulate and Reflect Heat
Insulate the grow bench area to prevent heat loss to the surrounding environment. Reflective materials like Mylar or aluminum foil can be used to direct heat towards the plants.
Monitor Humidity
Radiant heating systems can sometimes lead to lower humidity in the growing area. Be sure to monitor and maintain the appropriate humidity level for your plants, as some plants may require higher humidity for optimal growth.
Watering and Drainage
Ensure proper watering and drainage for your plants. The heat from the radiant system can affect the rate at which water evaporates, so you may need to adjust your watering schedule.
Maintain and Troubleshoot
Regularly check the radiant heating system for any issues or malfunctions. Clean the system as needed, and replace any worn-out components.
Optimize Light and Airflow
In addition to radiant heating, provide adequate lighting and airflow for your plants. Proper ventilation is important for preventing mold and disease.
Safety Considerations
Always follow safety guidelines and manufacturer recommendations when using any heating system, especially in a plant propagation area. Keep the system away from water sources to prevent electrical hazards.
Monitoring and Adjusting
Continuously monitor the temperature, growth, and health of your plants. Be prepared to adjust the temperature settings on the thermostat as the seasons change or as your plants' needs evolve.
By following these steps, you can effectively use radiant heating to create an ideal growing environment for your plants on a grow bench, promoting healthy growth and increasing your chances of success in propagation and cultivation.
My bench consists of:
- 2-gallon 1500watt hot water heater
- A circulation pump
- 60 feet of ½ pex tubing
- 6 LED full spectrum lights
- 3 LED white shop lights
- An Inkbird 308 thermostat
- Assorted small plumbing parts
- Lumber needed to create the 8’ X 2’ bench